Sunday, September 13, 2015

Editing workflows: the first steps

Inserting nodes in the workflow area:

  1. Open the palette


  2. Select the node you would like to insert by clicking on it


  3. Click on an empty space on the workflow area to insert the node


Connecting two nodes:

  1. From the palette, select the "Connection" tool


  2. Determine the source node and the required output terminal; hovering over terminals, a tooltip would be displayed showing the terminal name


  3. Click on the source terminal. If a connection is possible to start from the clicked on terminal, you will notice a line beginning from the source terminal and following your mouse moves


  4. Determine the target node and the required target terminal
  5. Click on the target terminal. If a connection is possible to end at the target terminal, the connection would be created and you will notice that the line end becomes an arrow head


Reconnecting a connection (changing connection endpoints):

  1. Click on "Select" tool from the palette
  2. Click on the connection you would like to re-connect. Two square handles show up one on each endpoint of the connection


  3. Click and drag the handle at the endpoint you would to change
  4. Drop the connection endpoint at the new terminal


Deleting nodes:

  1. Click on "Select" tool from the palette
  2. Click on the node you want to delete
  3. Press the <delete> key

Deleting connections:

  1. Click on "Select" tool from the palette
  2. Click on the connection you want to delete
  3. Press the <delete> key

Editing properties:

You can edit properties of:
  • workflow
  • node
  • a connection coming out from a "case" terminal of a "decision" node

  1. Open the "Properties" view
  2. Click on the item for which you want to add/change properties
    1. For the workflow, click anywhere in the empty workflow area
    2. For a node, click on the node
    3. For a connection, click on the connection
  3. In the "Properties" view, find the required property, edit it and press <Enter>
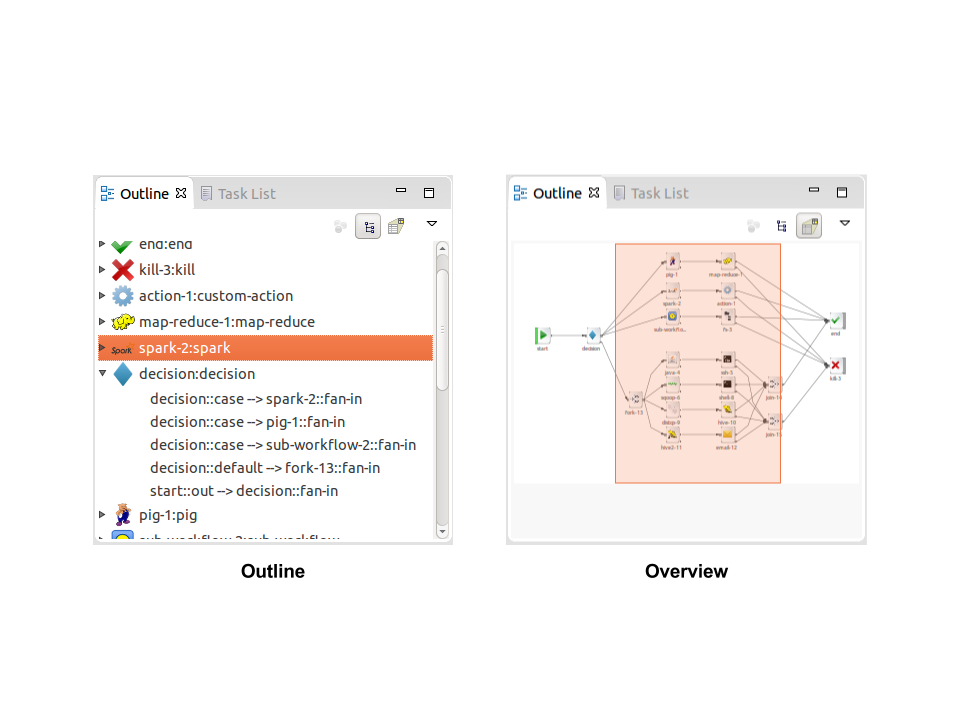
  4. A complex property has an arrow on the left of its name. You can expand (or collapse) the property by clicking on the arrow

Saturday, September 12, 2015

Getting started with Oozie Eclipse Plugin

Components of the Editor


  1. The Workflow area is an empty white space where workflow nodes and connections are placed.
  2. The Palette holds editing and node creation tools. Nodes are categorized into three categories: Control Nodes, Action Nodes and Extended Action Nodes.
  3. The Properties sheet holds the properties of the currently selected items.
  4. The Outline page is a kind of a summary of the workflow contents. There are two views: the outline view and the overview view. Each gives different kinds of shortcuts to reach and find workflow components.


  5. The Action bar holds shortcuts for useful actions: undo/redo, grid and snapping options, nodes alignment options, and zooming options.

Create a new workflow

  1. Go to File -> New -> Other... or press <Ctrl+N>


  2. Under "Apache Oozie" category, select "Apache Oozie Workflow" wizard and press Next >


  3. Select the parent folder where you want to place the new workflow file and enter the workflow file name then click Finish


  4. A new file will be created and opened in the workflow editor showing a start and an end nodes


Open an existing workflow

  1. Double click on the file from the Package Explorer
  2. In order to enforce the file to be opened by the workflow editor
    1. Right click on the file and select Open With -> Oozie Workflow Editor
    2. If the editor is not on the list, select Other..., then select Oozie Workflow Editor from the list


Prepare the editor

  1. Open the palette if it is hidden by pressing the arrow highlighted in the following images


  2. Make sure that the Properties view is opened
    1. Go to Window -> Show View -> Other...


    2. Select General\Properties from the list of views


  3. Make sure that the Outline view is opened
    1. Go to Window -> Show View -> Other...


    2. Select General\Outline from the list of views


Editing workflows: the first steps

ERROR: Missing requirement: Oozie Eclipse Plugin requires 'org.eclipse.gef 3.10.0' but it could not be found

If, during installation, you get this error message (or a similar error message):

Cannot complete the install because one or more required items could not be found. Software being installed: Oozie Eclipse Plugin 0.1.0.201508312352 (com.mashin.oep.feature.feature.group 0.1.0.201508312352) Missing requirement: Oozie Eclipse Plugin 0.1.0.201508312352 (com.mashin.oep.feature.feature.group 0.1.0.201508312352) requires 'org.eclipse.gef 3.10.0' but it could not be found
Then, you should manually install the required dependency.

Installing the Graphical Editing Framework (GEF) dependency (org.eclipse.gef 3.10.0)


  1. Go to Help -> Install New Software...


  2. Add this site "http://download.eclipse.org/tools/gef/updates/releases/", select "GEF (Graphical Editing Framework" and continue GEF installation.


  3. Re-install Oozie Eclipse Plugin


Install Oozie Eclipse Plugin

  1. System minor requirements
    1. Java 8
    2. Eclipse Luna SR2
  2. Open Eclipse
  3. Go to plugin page at Eclipse Marketplace in your web browser (say Chrome)


  4. Hover over the install icon and drag it


  5. Move to Eclipse window and drop the icon there
  6. Wait till the Eclipse Marketplace Client window shows up


  7. Select the plugin and press Confirm >
  8. Choose "I accept the terms of the license agreement" and press Finish


  9. When you asked "Do you trust these certificates?", check-mark the certificate "Ahmed Mahran; Oozie Eclipse Plugin; Mashin" and press OK


  10. Restart Eclipse to be able to use the plugin


  11. If you get errors during installation, check the following post(s):